How To: Install MS-DOS on a Modern Computer
For those needing to replace old controller hardware on cutting mills, those into native retro gaming, or for those who want to see what all the fuss was about in the 1980's, or for those who just want a play with old but great technology, this tutorial shows you step-by-step processing getting the breakthrough desktop operating system running on the latest greatest hardware.
Step 1: PreparationFor this project, you will need the following:1 copy of MS-DOS 6.22 floppy diskette images1 computer1 install of Oracle VirtualBox (it's multiplatform, so chances are you can obtain this). This is a free virtualisation application.some free hard drive space.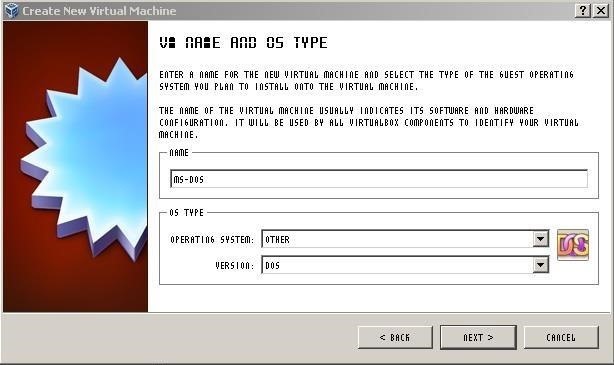
Step 2: Set Up the EnvironmentCreate a new VM called DOS. Use the Wizard in VirtualBox, that's what it's there for.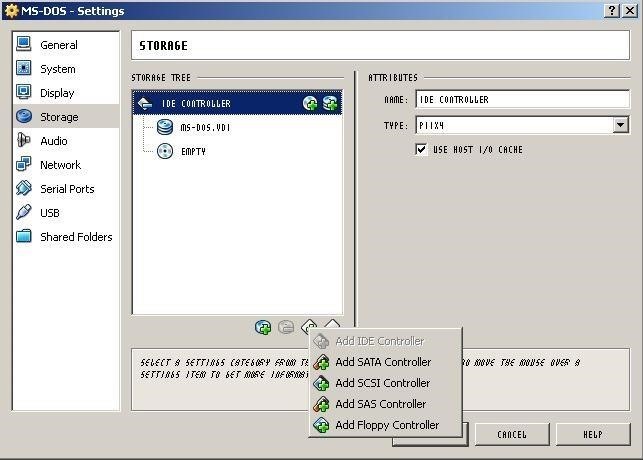
Step 3: Set Up the Environment (Continued)Leave the Base Memory set at 32MB. It's enough for most things DOS, any higher and you will start to see weird errors.Set up a NEW HARD DISK with dynamically allocated size NOT MORE than 2.00GB. FAT (the filesystem which MS-DOS 6.22 uses) CANNOT handle volumes larger than this!Once this is all set up and the Wizard finished, you should have a nice pristine DOS VM ready to be populated.Locate your floppy disk images. You won't be needing them just yet, there's one more thing you need to do. Right click on your new VM and select "Settings". Go to Storage and add a floppy controller.
Step 4: Building the Appliance 1. Initial EnvironmentNext add a Floppy Device (click the disk next to the new controller that just popped up) and choose the first disk in the installation images when asked. Click OK and start the VM.As it's a DOS VM it will first look for a floppy controller from which to boot. It'll go through the motions to install and eventually will ask for Disk 2.Don't panic, here's what you do: go to Devices->Floppy Devices->Choose A Virtual Floppy Disk File and select Disk 2. Same procedure for Disk 3. When the VM asks you to restart, remember to remove the disk image from the virtual drive or it'll throw a non system disk error!By the end of it you'll have a very basic DOS environment, ready to go. If the restart causes the system messages to appear on one line at the top of the screen, simply reset the VM.The next thing to do, before you do ANYTHING ELSE, is to clone the VM as it sits, use the clone for testing software before you commit the installation process to the original VM (potentially BREAKING STUFF if it goes wrong!), this way if you break a fully populated VM instead of having to rebuild and remember how you did it, you can just simply clone a spare.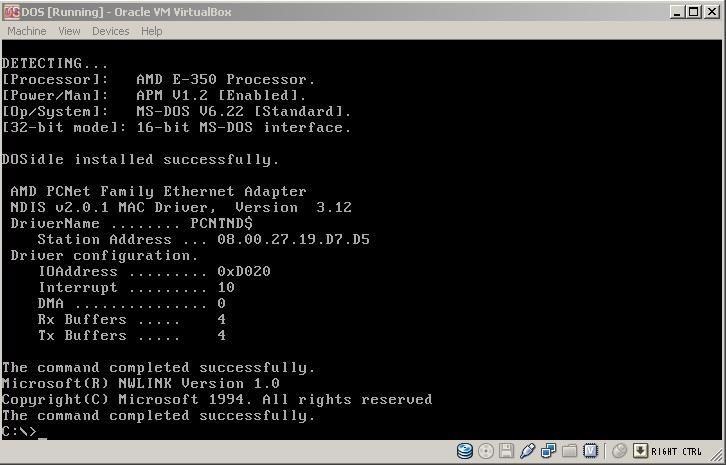
Step 5: Building the Appliance 2. Adding a CDROM DriverNext up, it's adding the CDROM driver. Simplest way (the only way at this point!) is to download a CDROM driver floppy image. Do a search for an OakCDROM floppy image, and load it like you did the DOS install images, then in your VM go to drive A: and xcopy all the files to your /DOS folder.Next step is to add this line to your CONFIG.SYS:DEVICEHIGH=C:\DOS\OAKCDROM.SYS /D:MSCD001Then add this to AUTOEXEC.BAT:LH C:\DOS\MSCDEX.EXE /:MSCD001Reset the VM. You should see a new drive (drive D:) pop up. You are now ready to install applications using CDROM images instead of swapping out floppy images!
Step 6: Adding StorageIMPORTANT caveat: Dblspace/Drvspace compression WILL NOT WORK on these appliance volumes, in fact attempting to deploy DxxSpace on a VirtualBox DOS appliance will BREAK IT. So please, don't ask me how to rescue a DxxSpace-broken appliance, because it cannot be done. This is why we have clones. Recovery is as simple as deleting the old broken clone and copying from the known-good spare (which I know you have!).This procedure is a lot simpler than adding a new hard drive. In fact, you don't even have to pop the cover on your computer!With the VM shut off, go into Settings->Storage and add another virtual hard disk (as shown). Click on "Create New Disk" and advance two screens. This is where you get to size it. Select Dynamically Allocated, and in the next screen adjust to 2.00GB or less (a reminder: DOS CANNOT handle a partition larger than 2.00GB). It might be an idea to give the new disk an identifiable label as well, like "DriveD". Hit Next then Create.Caveat: since this is a virtual appliance, you might be forgiven for thinking that you can just pile drive upon drive, but you need to remember that you're emulating an old APM system. The rules apply now as they did then: you cannot add more than four devices per IDE controller, and DOS does not support SATA in native mode (SATA in IDE mode works; VirtualBox seems to apply this mode automatically, so you can add more drives to a single SATA controller if you need to). So if you're trying to add more than four devices to the IDE controller, you're SOL; you'll have to add a SATA controller.My rule of thumb in this regard is: use a maximum of TWO IDE devices for virtual hard disks, add more via the SATA controller. Reserve the other two IDE device ports for the CDROM and things like Zip/Jaz drives, tape streamers, etc., that connect to the Host via the IDE interface or that you want DOS to access via the IDE interface. You now have a new drive in your VM, which you can access by starting the VM and running FDISK. Select Option 5 (change current fixed disk) and select disk 2. This will take you back to the main menu, where you can create a new partition and use the maximum available space on the volume to create a primary partition (this is the same as dedicating a standalone hard drive 2GB in size for storage on a single partition). To confirm this check the Partition Information and you should see something very close to what you see in the image. Exit FDisk, reset the VM then use the "Format d:" command to prepare the drive for use. As your storage needs increase, you can add up to 24 hard disk partitions total (including C:) before you run out of letters (after all, who really needs more than 48GB of space??), less if you have a CDROM driver installed.
Step 7: FootnotesSince MS-DOS is based on old APM BIOS technology, it's not 100% compatible with newer gear which these days uses EFI rather than Flash BIOS (ACPI). In essence, this causes the appliance to hog CPU resources since MS-DOS has zero concept of scheduling. The way around this is to install a program that resides in memory inside the appliance to throttle the CPU to the appliance. This also helps prevent crashes which can bring down the main system. Also, there are issues surrounding applications and games that use EMS; this can be gotten around by running them in an appliance running Microsoft Windows 95 OEM SR2 or 98/98SE.
LG Cosmos / LG Cosmos 2 / LG Cosmos 3 - Create and Send a
Swipe Your Screen to Skip Songs & Change Volume Without Even
Once you've enabled adaptive icons, you're now ready to add the new adaptive folders feature. To enable adaptive icons, head to Action Launcher's settings again, tap on "Folders and Shutters," then select "Style," and choose Adaptive. There is also an option to choose adaptive folders with only the outline shown.
Action Launcher 101: How to Set Up Covers & Shutters to Get
Here's how to jailbreak (or in the case of phones, unlocked) any iPod Touch, iPhone or iPad, using the new Spirit tool. But first, a disclaimer:
How to Jailbreak iPod Touch 4G for iOS 6.1.6 [EASY] - Windows
If you just can't wait to see the Pixel and Pixel XL, the new Google-branded smartphones expected to be announced tomorrow, you're in luck. After weeks of rumors and blurry images, a smartphone sales company called Carphone Warehouse just accidentally dropped the entire ball.
Google Goes iPhone XR With The Pixel 3a - forbes.com
This tutorial video will show you how to run the browser in safe mode for faster internet speed. In browsers add-ons consume memory and slow down the browser's speed. But you could open your browser in safe mode where the browser opens without add-ons. This safe mode increases internet or browser speed.
How to Get the New Google Navigation Menu - WonderHowTo
My Laptop used to work, I tried rebooting a few times it used to for for a few months, and then all of the sudden it all went black forever, I even tried taking the Batt out didn't even work, I took it to a repair shop and not even they can fix it, they said the start up screen just wont boot, so in the end I took it to HP :( I didnt get it
HP Notebook PCs - Computer Starts but Screen Remains Blank
The Note 9 not only scored far below last year's Apple flagship iPhone X (10,357 points) but also fell short of OnePlus 6's benchmarked score of 9,088 points.
Music Video - Strand of Oaks « Canon EOS 7D :: WonderHowTo
If you still ask for suggestions on the list, you can use Hotstar, Tubi TV, Showbox and terrarium for your purpose of watching free movies too. Other than these movie streaming apps, there are a whole lot of movie streaming apps but we chose these as they are absolute best and work on most of the smartphones.
Understand the electric motor. The electric motor is a device that runs on electricity to make something move. The object that rotates is called the electromagnet; this is where the electric current runs through. The electric motor is more flashy than the homopolar motor. It requires more effort but offers more of a spectacle.
How to Build a Simple Electric Motor: 10 Steps (with Pictures)
Just because vinyl records are analog, it doesn't mean you can't pirate them.All you need is a wood box, glass, window cement, silicone mixture, liquid plastic and a drill press. Hey, I didn't say
How to Pirate a Vinyl Record | Smiles | Vinyl record projects
If you're having a little trouble operating your newly purchased Samsung Instinct cell phone, let Sprint help you out. This Sprint video mobile phone tutorial takes you through every step necessary to fully familiarize yourself with the Instinct cell phone by Samsung. This instructional tour will
Samsung Instinct Cell Phone: How to use it as a modem
0 comments:
Post a Comment